This is a guide for configuring NextCloud Servers. To set up your own hidden NextCloud client, check out the client guide.
NextCloud is a tool for self-hosting services associated with many so-called “Cloud Services” providers, without requiring the provider itself. Cloud services providers participate in dragnet data collection and sharing with partners in the surveillance industry, so avoiding the provider is an important way of evading mass surveillance. However, it’s not always that easy to actually pull off.
NextCloud makes both incoming and outgoing connections, as in, you can visit the service and instruct it to make a connection to a remote server somewhere. This is a feature, but it’s also a risk to privacy because an authorized user could make a request to a service they control in order to ascertain information about the origin of the request. In this repository is a means of configuring a PHP application to use an HTTP Proxy for outgoing connections on a global basis, closing this privacy hole and also enabling the NextCloud server to fully interact with I2P. It does this by use of a “DockerPort” which is a neologism for a Proxy we set up specifically for use by Docker.
Additonally, in order to access your self-hosted services, you usually need to have a fixed address somewhere. The easiest way to do this is usually to use a cloud services provider somewhere to act as a rendezvous point, and forward you to the address where the server actually is. This still requires the cloud provider, it still leaks information to the cloud provider. If you’re brave and lucky, you’ll learn to search for terms like “Dynamic DNS” and eventually you’re doing annoyingly brittle stuff with port forwarding on SOHO networking equipment that maybe you remember the password for but you’ll probably look up in a manual you’ll get as a PDF from the internet and worry, knowingly, at the implications of that. Because you know you didn’t change that. In a year or two your hobby will lead you to something called a “DHT” and you’ll think “Dude that sounds kind of complicated to get set up but once it’s there that would be a way better way to do this. All I’d need is a hosts file.”*
Hi. Welcome to I2P. We’ve been doing this for a while. You can use ours.
This repository contains a Dockerfile which configures NextCloud for I2P using a DockerPort which is on port 4448. You can change this option by passing the environment variable http_proxy= at run time. On Linux and OSX, build the container by cloning this reposity and running docker build in your sh. On Windows, do the same thing, except in powershell.
Clone the repository using:
git clone https://github.com/eyedeekay/Nextcloud-over-I2P-on-Docker nextcloud-i2pThen, change to the directory you just cloned using:
cd nextcloud-i2pThis is the most important part. Create a file named .env inside of nextcloud-i2p directory. It should contain at least:
NEXTCLOUD_ADMIN_USER=anonadmin            ## The administrative username you want to use
    ## when you log into your NextCloud server
NEXTCLOUD_ADMIN_PASSWORD=examplepassword  ## The administrative username you want to use
    ## when you log into your NextCloud server
All of the other settings from https://hub.docker.com/_/nextcloud/ will continue to work as well, in case you want to configure a MySQL database in order to accomodate a larger number of users.
Build the repository using:
docker build -t nextcloud-i2p .Now you’re ready to run:
docker run -d --restart=always \
    -p 127.0.0.1:8080:80 \
    -v nextcloud:/var/www/html \
    --env-file .env
    --name nextcloud-i2p nextcloud-i2p
Your container is now running, but not accessible remotely yet, and it’s also protected by a password.
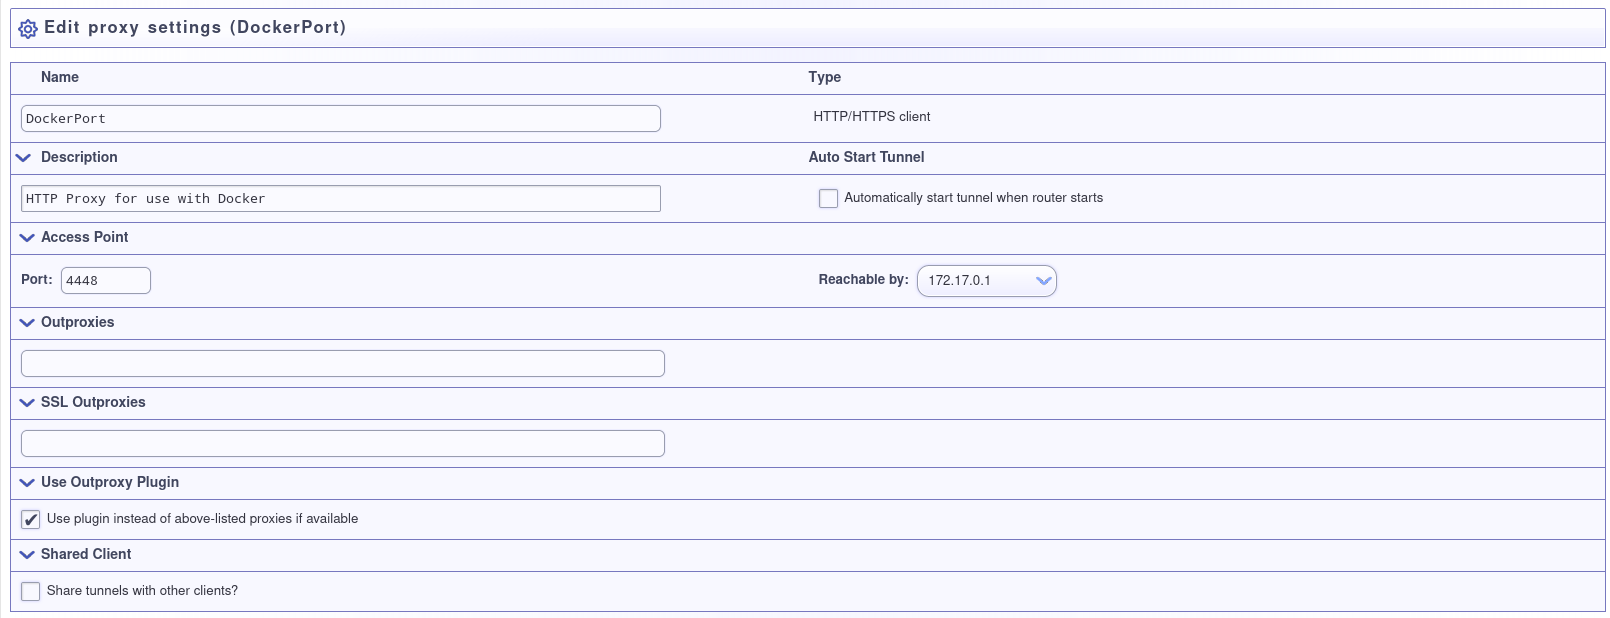
Nextcloud isn’t able to make connections to I2P Sites yet, because there isn’t a DockerPort for it to use yet. To create one, go to Hidden Services Manager and create an HTTP/CONNECT client. Configure it to be accessible on the Docker Bridge which is usually going to be on the address 172.17.0.1, and on the port 4448. No other changes are required, but you may wish to fine-tune them to your liking.

Now you’re ready to make your I2P NextCloud service available over I2P. Go back to Hidden Services Manager and this time, create a HTTP Server. Configure it to forward 127.0.0.1:8080 to the I2P network, give it a hostname, and save it. You may wish to fine-tune these setting as well, but the defaults are safe for most people.
